Got questions?
1. Payment Control Report (Multi-Database)
Connect your all databases one by one through Related Database Info. For it run Capex10 and follow the following steps:
1. In Reports menu >> Payment Control Report (Multi database) – New
2. Click on Related Database Info.
3. Enter the required details and save the information
4. Click on Update Database Information
5) Click on Update DB Info.
6) Click on Ok
7) Now again save all details
8) Go to Report Menu >> Payment Control Report (Multi database) – New
9) Enter details and Select required parameters
10) Click on calculate button to calculate
11) Click on view to view PCR Report
12) Sample PCR Report
Note:
This report is available in excel format
This is customized report, for more details contact Shilpi support
2. Configure PDF in Shilpi ?
For Create pdf files through software take below given steps:-
- Download Dllsetup.exeÂ
 Click here to download
 - Run setup, select program folder and finish setup.
- If you want only pdf file, then go to System File Maintenance & change “Delete Source File After PDF” to “Y”.Mail / FTP / Digital Setup
Step 1: Purchase a Registered paid E-mail* account & Digital Signature Certificate*. * For sending digitally signed mail.
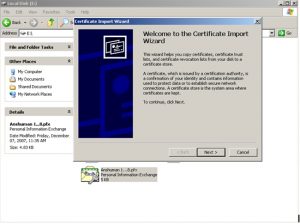
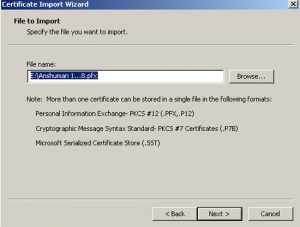
Step 2: Double click on Digital Signature Certificate for example: Anshuman 1…8.pfx to import certificate, following window will open
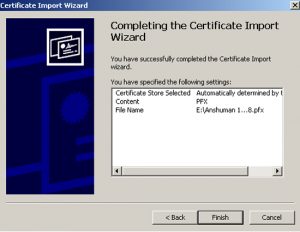
Step 4: To Import the Digital Signature Certificate.
Go to Master Menu, ‘MAIL\FTP\SMTP Setup’. Click on Cert Imp Button
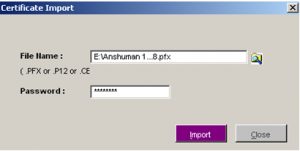
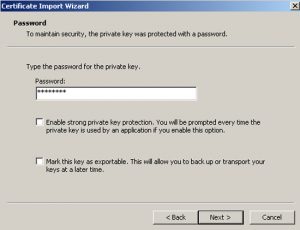
This Window will be shown, Browse File name for the Digital Certificate and Enter the password and Click on ‘Import’ Button.
Now open internet explorer >>Tools >> Internet Options >> Contents >> certificates. Double click on a certificate >> select details >> Note down serial no
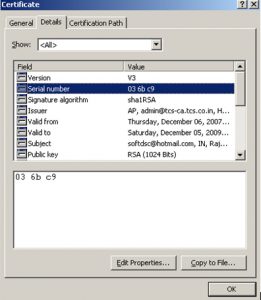
Enter this serial no in MAIL \ FTP \ SMTP Setup >> Certificate serial no field and other details
Note: Before save the information please remove spaces between serial no.
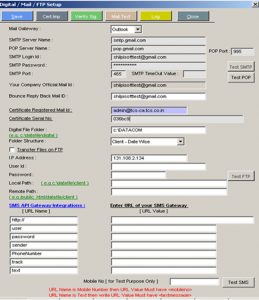
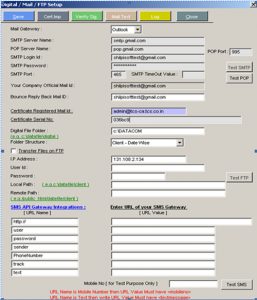
Example: Your Company Official Mail Id : shilpisofttest@gmail.com // mail id on which bounced mail returns
Certificate Registered Mail Id : shilpisofttest@gmail.com // digital certificate mail id
Digital File Folder : C:\Datacom // path of folder where digital/html files created
Folder Structure : Date-Client wise /Client —Date wise folder created
Step 5:
a. Select the mail gateway:
DIRECT >> To send the mail directly to the sender.
OUTLOOK >> To Send the mail through Outlook Express.
Configure your Outlook Express (Optional) on your Paid E-Mail account to send Digital Contract Notes.
Do this step only if the client wants to send the mails through Outlook
Otherwise they can send mails directly.
b. For sending mail directly Enter the following details
For Example :
SMTP Server name :: smtp.gmail.com // smtp details
SMTP login id :: shilpisofttest@gmail.com // email login id SMTP password :: ***** // email login password
SMTP ports :: 465 // port no. using for sending mail
c. These Options are also mandatory for sending mail directly.
Step 6:
Now Click OnÂ![]() to check the SMTP connection. If the message shows you unsuccessful connection then allow in firewall/antivirus.
to check the SMTP connection. If the message shows you unsuccessful connection then allow in firewall/antivirus.
Click On![]() also and message should be successful
also and message should be successful
Save the SMTP/ FTP details.
Step 7:
Go to Master >> Client Master. Enter the Client Code of the Client you want to send
Digital Contract Note. Enter their E-mail Id and change following parameters:
- Move to folder = Tick on it .
- Contract Type = Digital
- In the parameters/tags Box, Set Contract generate enable y/n = y
- Save the information.
Update the record of all the clients you want to send ‘Digital Contract Notes’.
Step 8:
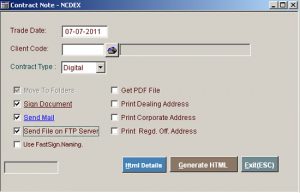
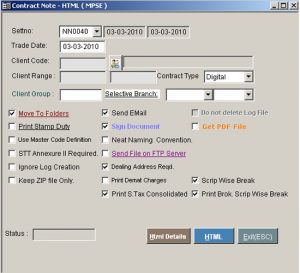
Go to Daily menu, Click Contract Note [HTML]. Click on HTML Details. Enter the name of the concerned person and address of the corporate Office.
For COMMEX users:
For cApex10 Users:
For foPRO10 Users:
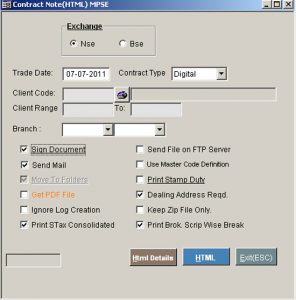
Tick “Sign Document” for Digital Signed Contract Notes, tick “Send Mail” for sending Digital Signed Contract Notes. “Generate HTML” will start sending Contract Notes at end of the process a message will display “HTML Contract Note Successfully Created/Sended”
# If Sign Document option is disabled, contact Shilpi Customer Support
Step 9:
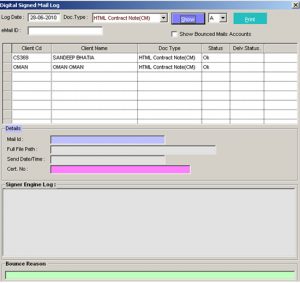
To see whether the Contract Note has been sent or not, Click on the log button in Master ‘DIGITAL/MAIL/FTP Setup’ or you can also see from the option Utilities >> Digital Signed Log. Enter Date of the contract notes generated and Click on View, here you will find the sending information of digital contact notes.
Software performance issue
For better performance of software please insure that the following given indexes must be in database :
1. Valid indexes in Commex10: For check the indexes in database run utilcap10.exe from Commex10 folder (program folder). Connect the database and go to Commex menu and select “create/verify indexes (commex)” then select table name. It will show all available indexes. If find any invalid/drop indexes then click on Re-create (all) button to create indexes.
2. Valid indexes in cApex10: For check the indexes in database run utilcap10.exe from cApex10 folder (program folder). Connect the database and go to Maintenance (cap+fo) menu and select “create/verify index” then select table name. It will show all available indexes. If find any invalid/drop indexes then click on Re-create (all) button to create indexes.
3. Valid indexes in DP: For check the indexes in database run utilcap10.exe from DPORA10 folder (program folder). Connect the database and go to Nsdl (DP) menu and select “create/verify index” then select table name. It will show all available indexes. If find any invalid/drop indexes then click on Re-create (all) button to create indexes.
4. Valid indexes in Cdsl: For check the indexes in database run utilcap10.exe from CDSLl10 folder (program folder). Connect the database and go to Nsdl (DP) menu and select “create/verify index” then select table name. It will show all available indexes. If find any invalid/drop indexes then click on Re-create (all) button to create indexes.
3. Portable Document Format {PDF} File Creation > What is PDF File Format ?
Portable Document Format (PDF) is a file format developed by Adobe Systems for representing documents in a manner that is independent of the original application software, hardware, and operating system used to create those documents. A PDF file can describe documents containing any combination of text, graphics, and images in a device independent and resolution independent format.
Features :
Open format — De facto standard for more secure, dependable electronic information exchange – recognized by industries and governments around the world. Compliant with industry standards including PDF/A, PDF/X, and PDF/E.
Multiplatform — Viewable and printable on any platform – Macintosh, Microsoft® Windows®, UNIX®, and many mobile platforms.
Extensible — More than 1,800 vendors worldwide offer PDF-based solutions including creation, plug-in, consulting, training, and support tools.
Trusted and reliable — More than 200 million PDF documents on the web today serve as evidence of the number of organizations that rely on Adobe PDF to capture information.
Maintain information integrity — Adobe PDF files look exactly like original documents and preserve source file information – text, drawings, 3D, full-color graphics, photos, and even business logic – regardless of the application used to create them.
Searchable — Leverage full-text search features to locate words, bookmarks, and data fields in documents.
4. Security system
Security means different things to different people. It may even mean different things to the same person, depending on the context. For us, security boils down to enforcing a policy that describes rules for accessing resources. If your software misbehaves, a number of diverse sorts of problems can crop up: reliability, availability, safety, and security.
The way, which can prevent your valuable databases by using, cApex in-built capability. Explore and use it.
Here is tip and tricks, which can help us to implement such powerful capability of cApex security in your system. The dramatic increase in the use of IT has exposed organizations to misuse on their information systems, assets and databases. Unfortunately, protecting against the misperceived threat is expensive and ignores the real danger of intentional or accidental security breaches from internal, trusted sources.
An administrator can authorize application to different level of employees based on there individual responsibility. Suppose there are three types of departments like marketing, trade, finance etc. common application works for all but when security and alteration comes then we have to segrate responsibility so that we can define and understand each department workflow.
CApex have in-built robust security system, which can protect and secured your application and database from unauthorized access. Here is details description how we can impose security system.
Have a security strategy for user and administrator accounts and passwords.
If we don’t want unauthorized users logging in to our system, and they do, then we have a security violation on our hands.
Have several accounts for special purposes on your system. Be in control of all access to your system by other users, and don’t use Guest access without a good reason.
To access security system, you can logged in by using cApex default admin / password like this.
ID : admin
Password :Â anil

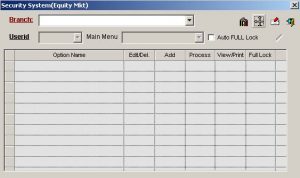
You will find the ‘Security System’ option highlighted in ‘System Utilities’ under ‘Utilities’ menu. This feature will be enabled when logged in through admin controls; means will be disabled (covered with grey colors).
Drag mouse and choose ‘Security System’ under Utility main menu.
![]()
![]()
When you will click on it, the following window will display. Â
To creating the new user click on ![]() button. The following window will appear: Â
button. The following window will appear: Â
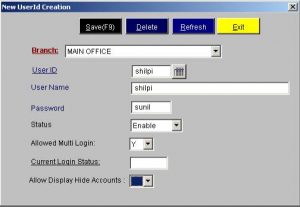
1. Enter the required information and Save it.
Branch : Select the branch for e.g. main office
User id : write the user id for e.g.shilpi
User name : write the user name for e.g. shilpi
Password : write the password for e.g. Sunil
Status : select enable.
Allowed multi login: if select yes then you are allowed to login in various machine and if select no then once you are logged in one machine you are not allowed to login in other machines .it depends on the Administrator’s choice what login permissions he wants to provide to a user.
Branch, user id, user name, password, status and allowed multilogin these fields are mandatory to fill and save them
2. Message will appear your id has been successfully created
3. Exit from this window
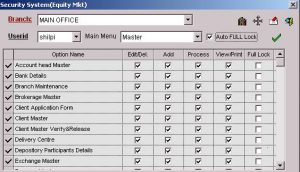
Select the branch, user id and main menu as shown in the above window
Branch >> it contain all the branches. Select the branch under which you create the user id for e.g. main office
User id >> select the user id for e.g. Shilpi
Main menu >> it contain 12 options which is coming under capex
The windowpane showing as below :
There are the option names and in front of that the permission which we can grant to them. Whatever the permission we want to grant to a user whose user id is selected priorly by checking the checkbox below it
- Option name >> this contains all the options & sub options which come under the selected main menu Edit / del >> by checking edit/del in front of an option, we can grant a user the permission to edit or delete a record from the software
- Add >> by checking grant permission to add record
- Process >> by checking grant permission to process a file or importing the file
- View/print >> by checking grant permission of view/printing the file
- Full lock >> locking the menu completely i.e. user will not be able to use the selected option at all
1. Whatever the permissions the administrator want to grant the user, he checked in front of the option
2. If the administrator does not want that user to access an option completely check full lock in front of it
3. If the administrator wants that user access the option but does not do any type of edition /deletion then uncheck that checkbox in front of that option and save it.
4. There is also a provision to hide/dim all the options under a menu. For that select the menu in main menu and check auto full lock and save it
![]() >> This icon is used to see the client list. Whenever clicked following window will appear
>> This icon is used to see the client list. Whenever clicked following window will appear
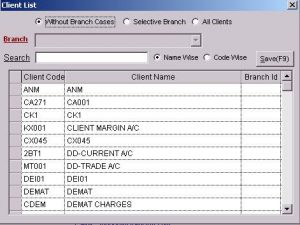
The user according to their own convenience uses this window. There are three options along with their radio buttons without branch cases, selective branch and all clients
1. if select without branch cases then without branch clients are shown on the screen
2. if select selective branch then select the branch. It will show all the clients under that branch
3. if select all clients then all the clients are shown on the screen
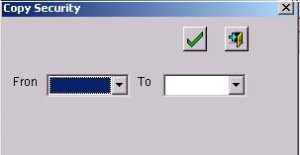
![]() >> Copy security is a powerful and comprehensive data migration solution that automates the copying of data between one User id into another use rid .By click on them following window will appear. select the userid in both the windows and save them
>> Copy security is a powerful and comprehensive data migration solution that automates the copying of data between one User id into another use rid .By click on them following window will appear. select the userid in both the windows and save them
From this window lock up expensive data supplies, locking mechanisms can reduce theft or tampering.
User control : People should only have access to applications and information required to perform their assigned job function. Even if approved for access to a restricted file, a user can be limited to viewing it from a certain workstation at a specific time. Organizations should also control who can create accounts or add users to the system, and audit the system frequently for dummy IDs or accounts.
5. Bank Reconciliation
Select Financial >> Bank Reconciliation >> Opening Entry
- For Bank Opening Entries   : Select Bank Data Or For Voucher Opening Entries : Select Voucher Data
- Bank Name                      : Select Bank Name
- Click                               :

- Enter Entries
- SaveÂ

For Opening Balance Entry of Bank :
- Select Bank Data
- Enter Amount in Opening Balance
- Enter As on Date
- SaveÂ
6. Settlement of Accounts
The actual settlement of funds and securities shall be done by the broker, at least once in a calendar quarter or month, depending on the preference of the client. While settling the account, the broker shall send to the client a ? statement of accounts? containing an extract from the client ledger for funds and an extract from the register of securities displaying all receipts/deliveries of funds/securities. The statement shall also explain the retention of funds/securities and the details of the pledge,
if any. for more details Click Here
7. Save your Reports on Shilpi Server
Reports are very crucial part of organization and modification and thought take longer time and very difficult to explain and build up again . So Put all your customized qrp on Shilpi Server for Safety
for more details and display how to Upload/Retrieve please Click Here.
8. Use e-Token for Sending Digital Signed Documents
Digital Signing process now has been changed , previously it was from pfx and now e-Token. Shilpi has successfully added functionality in Software so please following below link for settings to send digitally signed document by e-Token
For more details Click Here.
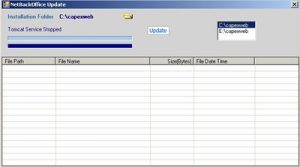
9. How to update your Net-Back Office
We have provided new NetUpdate.exe for update capexweb Live version. Now no need to Stop Apache
Tomcat Services and remove work folder before update Capexweb live version. It would be very easier
for all. See the following Steps.
1. Go to Download Net BackOffice Update Utility
2. Download netupdate.zip, it is available at No. 5.
3. Extract this file in a folder.
4. Run NetUpdate.exe, Select the folder in which you have capeweb folder and click on update.
5. “Your NetBackOffice is Up-to-Date Please Close Application” message would be shown after update
Capexweb Live Version.
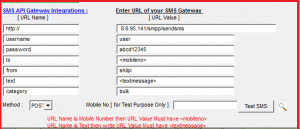
10. Setup SMS API
Take following steps for implementing SMS API.
1. Take API Settings Link from SMS Vendor and get message templates approved from your SMS vendor.
Sample SMS API for reference
http://8.6.95.141/smpp/sendsms?username=user&password=abcd12345&to=9371666443&from=shilpi&text=silver56146&category=bulk
2. You will get API link as given in sample reference.
3. Login Shilpi Application
4. Go to Master –> Mail FTP/Digital Setup
5. Enter Red Mark Text in “URL Name “ and Blue Colours Text in “URL Values” (as shown in sample )
6. Fill URL details as following in option under SMS API Gateway Integration
7. http:// ………… 8.6.95.141/smpp/sendsms ( ‘?’ not required to put)
8. username ………… user
9. password ………… abcd12345
10. to …………<mobileno>
11. from ………… shilpi
12. text …………<textmessage>
13. category ………… bulk (**If you don’t have values for this/Last column then enter spaces in both column)
14. Please don’t Change and as given in URL Values these values will remain same as shown in URL values.
15. After updating the information save it. Then test setting by entering mobile No.
16. If you receive a SMS at entered mobile no. than your SMS API setting is properly configured.
11. Implement Balance Sheet Schedule VI
Form and contents of Balance sheet and Profit & Loss Account of a company under Schedule VI to the Companies Act,1956 revised.Ministry of Corporate Affairs [MCA], Government of India, has on 3 March 2011, hosted on its website, the revised Schedule VI to the Companies Act, 1956 which deals with the Form of Balance sheet, Profit & Loss Account and disclosures to be made therein.The revised Schedule VI has been framed as per the existing non-converged Indian Accounting Standards notified under the Companies (Accounting Standards), Rules, 2006 and has no connection with the converged Indian Accounting Standards. Please follow step by step to implement Schedule VI in Shilpi Softwares.
For more details Click Here